ClashNodes
vue在table表中悬浮显示数据及右键菜单_vue.js_
本文实例为大家分享了vue在table表中悬浮显示数据及右键菜单的具体代码,供大家参考,具体内容如下
悬浮显示
这个文档里是存在的,但很容易被忽略,先看看效果图
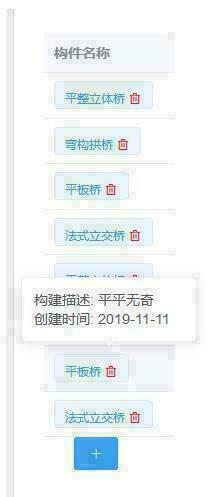
鼠标放在哪行,就会弹出相对应的描述。
直接看代码
//列名及属性名 <el-table-column prop="member" label="构件名称"> //从json数据调取 <template slot-scope="scope"> //悬浮显示数据 <el-popover trigger="hover" placement="top" > <p>构建描述: {{ scope.row.memberTxt }}</p> <p>创建时间: {{ scope.row.date2 }}</p> <div slot="reference" class="name-wrapper"> //行显示数据 <el-tag size="medium" > {{ scope.row.member }} //数据后加删除按钮 <el-button icon="el-icon-delete" type="text" class="red" @click="handleDelete(scope.$index,scope.row)"> </el-button> </el-tag> </div> </el-popover> </template> </el-table-column> 只是这些就足够了,表的设置无需做更改,用到右键菜单时才会更改;
右键菜单
这与上个可以没有关系,也可是同一个,取决于自己!
依旧是先看图
右下角的菜单就是右键的菜单了;
我们来看具体实现:
首先就是表格的设置
文档中表格有这个事件,
<el-table :data="tableData" type="expand" class="table" ref="multipleTable" header-cell-class-name="table-header" @row-contextmenu="rowContextmenu"//主要就是这个事件 @selection-change="handleSelectionChange">
当然,在表格下面,还要写重要的一步
<context-button v-if="menuVisible" @foo="foo" ref="contextbutton" @handleOne="handleOne" @handleTwo="handleTwo" @handleThree="handleThree" @handleFour="handleFour" @handleFive="handleFive"></context-button>
这些@handle对应点击事件
接下来就是methods
rowContextmenu (row, column, event) { this.menuVisible = false this.menuVisible = true // 阻止右键默认行为 event.preventDefault() this.$nextTick(() => { this.$refs.contextbutton.init(row,column,event) this.updForm = row; }) }, foo() { // 取消鼠标监听事件 菜单栏 this.menuVisible = false /* document.removeEventListener('click', this.foo) */ }, handleTwo () { }, handleThree () { }, handleFour (){ }, handleFive (row){ } 那些handle开头的方法是右键菜单的方法,我自己写的就不公布了,知道是点击按钮事件就可以了
重点,上面我们在表格下面写了神秘代码就要用到了
在你使用的vue界面的目录下创建一个“contextButton”文件夹,对应 上面的ref即可,注意大小写!
在文件夹下创建vue页面
首先是html,也就是右键菜单显示的内容了
<template> <div id="contextmenu" class="contextmenu"> <div class="contextmenu__item" @click="handleTwo()">设计信息</div> <div class="contextmenu__item" @click="handleThree()">查看图纸</div> <div class="contextmenu__item" @click="handleFour()">查看模型</div> <div class="contextmenu__item" @click="handleFive()">修改信息</div> </div> </template>
然后就是script
export default { name: "index", data () { return { collapse: false, } }, methods: { init (row, column,event) { let menu = document.querySelector('#contextmenu') let cha = document.body.clientHeight - event.clientY console.log(document.body.clientHeight,event.clientY,cha) if (cha < 150) { menu.style.top = event.clientY -0 + 'px' } else { menu.style.top = event.clientY -60 + 'px' } menu.style.left = event.clientX - 200 + 'px' document.addEventListener('click', this.foo) }, foo () { this.$emit('foo') }, handleTwo () { this.$emit('handleTwo') }, handleThree () { this.$emit('handleThree') }, handleFour (){ this.$emit('handleFour') }, handleFive (row){ this.$emit('handleFive') } } } 位置的话是随着你右键的不同位置二不同的
如果不喜欢这个位置,可以自己改变
最后就是样式了
.contextmenu__item { display: block; line-height: 34px; text-align: center; } .contextmenu__item:not(:last-child) { border-bottom: 1px solid rgba(64,158,255,.2); } .contextmenu { position: absolute; background-color: #ecf5ff; width: 100px; font-size: 12px; color: #409EFF; border-radius: 4px; -webkit-box-sizing: border-box; box-sizing: border-box; border: 1px solid rgba(64,158,255,.2); white-space: nowrap; z-index: 1000; } .contextmenu__item:hover { cursor: pointer; background: #66b1ff; border-color: #66b1ff; color: #fff; } 颜色什么的都是我喜欢的,不喜欢的话可以自己改变。
上一个:详解盒子模型和div布局
热门文章
- 宠物粮食生产配方表最新(宠物粮的配方)
- LevelDB 学习笔记2:合并
- 1月29日|Shadowrocket/V2ray/SSR/Clash每天更新21.5M/S免费节点订阅链接,Clash便宜机场订阅
- 1月6日|Clash/Shadowrocket/SSR/V2ray每天更新19.4M/S免费节点订阅链接,Clash便宜机场订阅
- 3月2日|V2ray/Clash/Shadowrocket/SSR每天更新20M/S免费节点订阅链接,Clash便宜机场订阅
- 1月5日|Clash/SSR/Shadowrocket/V2ray每天更新18.7M/S免费节点订阅链接,Clash便宜机场订阅
- Spring如何快速上手
- 1月10日|Shadowrocket/SSR/V2ray/Clash每天更新22.3M/S免费节点订阅链接,Clash便宜机场订阅
- 治疗仓鼠宠物医院在线咨询(治仓鼠的宠物医院)
- 1月28日|Clash/V2ray/Shadowrocket/SSR每天更新21.8M/S免费节点订阅链接,Clash便宜机场订阅